
 3/04/2010 11:01:00 AM
 Mark
Mark
So you've been flipping through your favorite fly fishing magazine, gawking at the beautiful photos for years and you finally decided to take the plunge, get a new digital camera, and do this yourself. You got yourself a modest camera and a memory card and for the first few months, it was fun taking pictures on your fishing trips.
Little by little, though, you started to see that all of your pictures looked more or less identical: a fish lying on the ground, or a buddy holding a fish, smiling. While this certainly helped capture the memory of that day, you'd hoped it'd be more interesting than a series of the same shots with different backgrounds. Little by little, you slowed down on taking pictures, to the point that you rarely even bring your camera with you anymore. It's not that you don't like pictures, but, really, how many pictures of a fish in the mud does one guy need?
While this article may not make you the next Ansel Adams, hopefully it will stimulate some ideas and creativity on your end, as well as help to solve a few of the most common problems that plague many fisherman-photographers.
1. Be Ready
This is a seemingly small and obvious point that, really, plagues more fisherman than most other issues. I'm not saying you have to cast with one hand and hold your camera in the other...or even wear your wrist-strap at all times, but keeping your camera in your jeans pocket...under your waders...is a surefire way to make photography such a pain in the butt that you probably wont take a single shot that day. I usually keep my camera in the front pouch of my waders, in an inside pocket of my vest, or in an outside pocket of whatever jacket I may be wearing. The point is that if retrieving the camera is a quick, hassle-free process, you'll be far more inclined to get it out and take some pictures.
2. Take lots of pictures
So you get back from a great day on the water, pop your memory card into the computer and check out the shots you've taken! ...both of them. You've got a nice one of your buddy releasing that 20" rainbow, and one of that pretty waterfall you passed on your way in...but somehow, your shot of your friend is blurry, and the waterfall is very dark. Leaving you, effectively, photoless.
The solution, obviously, is to take more pictures...but this works in two ways. First, remember this is a digital camera, and film is free. You can take as many pictures as you want, without spending one extra cent per shot. With the 8GB card in my camera, I can get over 1500 shots with my 10MP image size. This means that there's no downside in taking five or ten shots of that waterfall. If the lighting isnt quite right, you can fool with the settings and shoot five or ten more. No worries! Adjust settings like exposure compensation, white balance, scene mode, and flash until you get something you like.
The other way digital photography helps you is that there's no downside in taking pictures of the smallest mundane thing that strikes your fancy. Think that little red flower by the trail might be photo worthy? It is. Snap the shot (or five, or ten). Worst case scenario: you DO manage to fill up your card. No worries, cycle back through your images and delete a few that you can see right away don't make the cut (really, in 5-10 shots, there will be a few that you can tell right away aren't as good as a few of the others). Gone are the days of having 20-30 exposures to capture everything. You've got technology on your side. Take advantage of it.
3. Post-process
Got a shot that would be great, but you held your camera at an angle? No problem. Straighten it out on the computer. Got some blur on the edge of that shot where your finger was too close to the lens? Crop it out. Today's image editing software is user-friendly and readily accessible, with a short learning curve in many cases. Don't think you have what it takes to be a digital darkroom whiz? Think again. There are several pieces of high-quality, easy-to-use, FREE image editing software available. From web-based tweaks in something like Picnik, to a downloaded image organizer/editor like Picasa, it really is simple to brush up most photos just by dragging a crop box and adjusting a few sliders. If you want to take your editing to the next level, take a look at GIMP, which many people compare to Photoshop. All three of these utilities are completely free, by the way.
Tip: If you're afraid of ruining a great shot, just make a copy of the image file and hack-n-slash away at the copy, keeping your original in pristine condition.
4. Include People
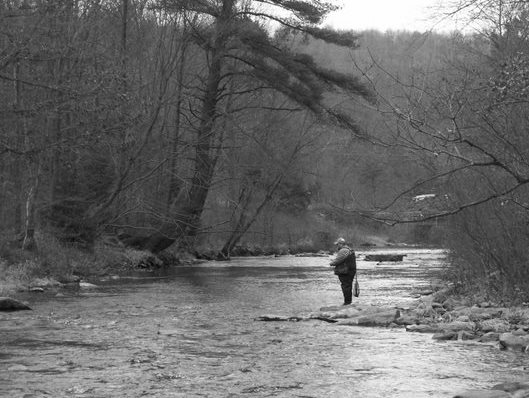
Granted, this option is a tricky proposition if you fish alone. But any time you're on the water among friends, take advantage of the situation. Though it's probably not necessary with friends, it might be a good idea to let them know ahead of time that you plan to take pictures throughout the day, just in case any of them aren't comfortable with the idea. Let them know that they don't have to stop, turn, and smile. Its important for you to remember that the "hero shot", holding a fish up with a cheesy grin, isn't the only fishing picture to be had on the stream. Snap pictures of friends casting, fighting fish, putting on waders, taking a break, laughing at a joke, lighting up a cigar...everything that makes a trip with friends memorable. Take a look at this shot I took of my dad, fishing the Black Moshannon last fall.
5. Mind Your Lighting
This can be a tricky concept for those who don't have more than a casual interest in photography, but lighting is really what will make or break a photo. To make things worse, there are no hard and fast rules for lighting, other than the assurance that too much or too little will ruin the shot.
In simplest terms, for sunny, outdoor, daytime photography, the sun will provide all the light you need. For acceptable lighting, put your back toward the sun, and on the subject, without casting a shadow on it and fire away. This, however, leaves your subject squinting into the harsh light, and can often leave the picture looking bleached and washed out in shades of white. The best way to alleviate this is to refer to to my second tip: take lots of pictures. Try different angles and different locations, and remember what you did, what worked, and what didn't, for those times when you may not have the luxury of snapping as many shots as you like.
Contrary to what you might think, you don't want bright, intense, even sunlight for the best pictures. Rather, concentrate on the "golden hours", those being the hour after dawn, and the hour before dusk, for great sunlight for photography. These times give you vibrant, non-blinding light, at an angle that is easy to work with for great pictures. This light will also be great for getting the colors in your photo to really "pop".
On the flip side, you won't have sunlight as an option when taking photos of your recent ties at the bench. For tying photography, your lighting will depend, nearly completely, on artificial lighting sources. In this situation, the best advice I can offer is that if you think you have enough light, you almost assuredly don't. One standard incandescent desk lamp plus the lighting fixture that lights the room is not enough. Fluorescent lighting provides more even, penetrating lighting, but even at that, the tube must be close to the subject, within inches, not feet, of the vise. The best solution is a nice, bright halogen or fluorescent desk lamp, or better, a pair of them, as well as some sort of "photo studio" for your flies, that gathers, but diffuses the harsh, close lighting. A few (inexpensive!) examples of this are as follows:
DIY Macro Photo Studio
Light Box/Light Tent
Fly Studio
For my tying, I simply don't have the room to construct any of these (yet). I just snap my shots right there at the vise, though I do use a full spectrum Ott light to provide bright, even lighting, as well as a sheet of blue craft paper for a background. This background will help your fly stand out as well as eliminating background distractions for both your audience and your camera's autofocus. Just be sure to choose a color that isn't even close to any of the colors on your fly. Blue is a great choice for the majority of flies, and at less than 30 cents per sheet, picking up a few colors isn't going to drain your account. Here's a few shots of flies at my vise:
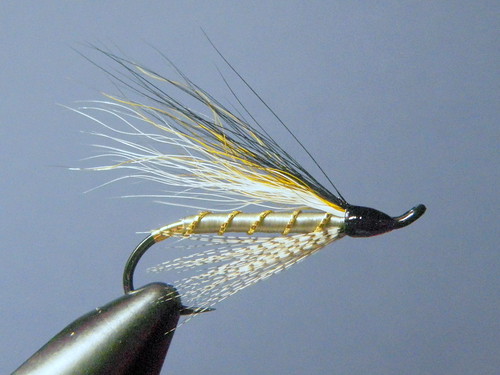
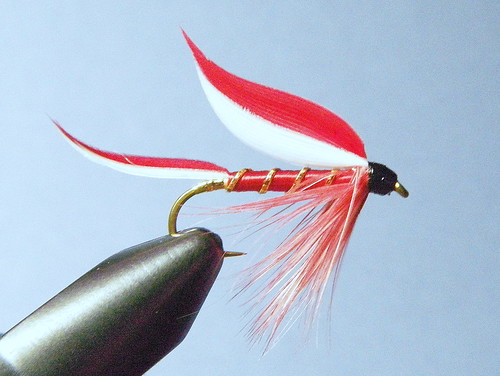
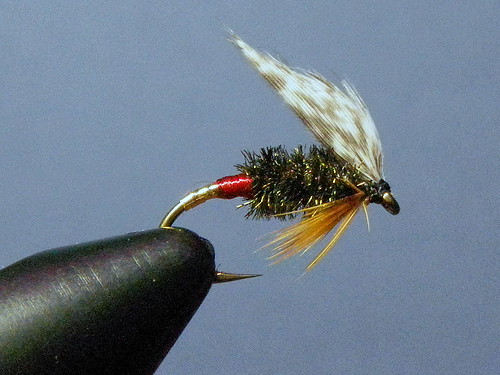
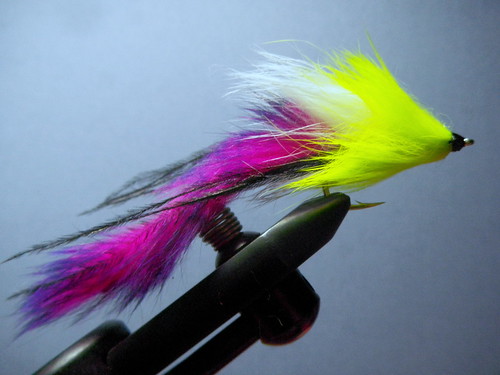
As you can see, with the bright even lighting and simple background, my photos are well-exposed, with good color, if not exceptional, standout examples of macro photography. The same sheet is used as the background for all of these, so, really, I could have been somewhat more consistent in my color and brightness, but for my purposes, each of these flies is, in my opinion, well represented in the photo. The issue of color representation brings up my next point...
6. White-Balance, Use It
What is white-balance? Simply put, it's defining what, exactly, your camera thinks is white. While this may seem insignificant (white is white, after all), when you realize that your eyes constantly adjust white balance for your brain, and that your camera uses this setting to determine every other color, it becomes a bit more relevant.
Most, if not all cameras have an Auto setting for white balance, which usually works great outside. Afterall, sunlight is full spectrum, complete, natural lighting that brings out the color the camera recognizes as white in object that are, as your eye sees them, white. The problem arises when you walk inside, into a world where light is provided by really hot pieces of metal and ionized gases. You may think nothing's changed, but again, your eyes and brain have taken care of that for you subconsciously. Ever see those pictures where everyone and everything in the room has an orange cast to it? That's an improperly adjusted white balance. See, lightbulbs give off light that is "warmer", or more red, than sunlight. Meaning that, without adjustment, your camera will duly note that everything in the room has the same cast of red. Likewise, fluorescent tubes have a bluish cast on their light, which is said to be "cool".
Luckily, adjusting for this is easy with a digital camera. Just find the white-balance setting on your camera, and adjust it until the image on your LCD screen has colors that look the most like what your eyes are seeing. Most cameras will have "AWB", or auto-white balance, as well as a few handy pre-sets for daylight, shade, tungsten (incandescent bulbs), and fluorescent. Many cameras also have a custom option. My Pentax Optio WS80 has this option, and I use it all the time. To use it with my camera, I simply select the custom option, and it gives me a box in the screen that I simply point at something white, and press the shutter release as if taking a picture. This, to the camera, points at that object (a piece of paper, usually...or snow), and says, "This...this is white. Make this white.", and adjusts all other colors accordingly. For my use, this option has been nearly flawless.
Bottom line: learn to use the white-balance adjustments on your camera. You will be glad you did.
7. Use Macro
This is something so simple that it should really go without saying, but it's surprising how many people don't do it. Simply put, when taking pictures of small objects, the image your camera makes of the object will often be larger than the object itself. This is macro photography. And when you're doing this, you should use the setting for it.
Usually denoted with the symbol of a flower, macro is a setting most often encountered on point & shoot cameras as a scene mode or a focus option. Either way, when taking pictures of small objects, you need to switch to it. This includes, obviously, flies in the vise. It also includes flies (the natural ones) that land on your rod, close-ups of your sweet new reel, very small fish, like native trout, close-ups of large fish, and that nasty poison ivy rash your buddy got all over his...well...actually, don't take a picture of that.
This setting tells your camera that the object is tiny and that the object is very close to the lens, and it adjusts accordingly. Help your camera help you. Use macro.
8. Don't Move!
Again, this seems obvious, but under the surface, it is responsible for more bad camera reviews than any sort of mechanical deficiency. When you press the shutter release, the shutter releases (shocking, I know), and for the briefest of moments (less than 1/50 of a second) the image sensor in the camera is exposed to the light coming through the lens (hence the term 'exposure'). The image sensor takes the light that is coming in, in that instant, and adjusts the pixels of color accordingly to produce the image you see on your screen a few seconds later. The trick is getting enough light to the sensor for it to, well, make sense, of what it's seeing. A camera does this in one of three ways:
1. Make the hole bigger. This is also known as opening the aperture. While this is a great method, the aperture can only open so far.
2. Make the sensor more sensitive. Increasing the ISO setting of the camera will make the sensor more sensitive to the light that is coming in. Unfortunately, the higher the ISO, the worse the image, which is why night scenes often appear horribly grainy. It doesn't take too much of this "noise" to ruin an otherwise great shot, though, so you really want to keep the ISO as low as possible.
3. Keep the hole open longer, to let more light in. This is the option the camera likes to use when it can, as a slower shutter speed won't (necessarily) degrade the image at all. That is, there is nothing in the technology of the camera that makes this a bad option. Unfortunately, the source of the crappy image in this case is (usually) what's behind the camera. You.
See, the trouble with a slow shutter speed is movement. Its like taking a still shot from a movie and choosing one small speck on the screen and saying "that speck is blue". Now, watch that speck for the whole movie, then tell me what color that speck was for the whole movie. Obviously it changes and there's not one correct answer. Essentially, you're asking your camera to do this, and its frustrated answer is a horribly blurred image. There's 2 movements that cause this: your subject, and you. The first, you can't do much about, and that's why sports photographers (who take pictures of distant, fast-moving subjects in poor artificial lighting), don't show up to the game with Kodak Easy Shares. No, they have big name Canon and Nikon lenses as long as your arm that could be traded straight-up for a car. No lie.
So for low-light STILL shots, you're limited to using your flash on close subjects (usually flash has a range of about 15 feet or so, tops) and risk blowing out the image in a wash of harsh white lighting (which lets your camera speed up that shutter), or ensure that there's no movement of the camera at all.
I do this with a 2-tactic approach.
First, use a tripod. I know it sounds ridiculous, but it helps. Greatly. Now I'm not saying you should take a 4 foot tripod fishing with you, but for images of your flies, if the whole image is turning out blurry, a tripod will definitely help you immensely. They're not that expensive, either.
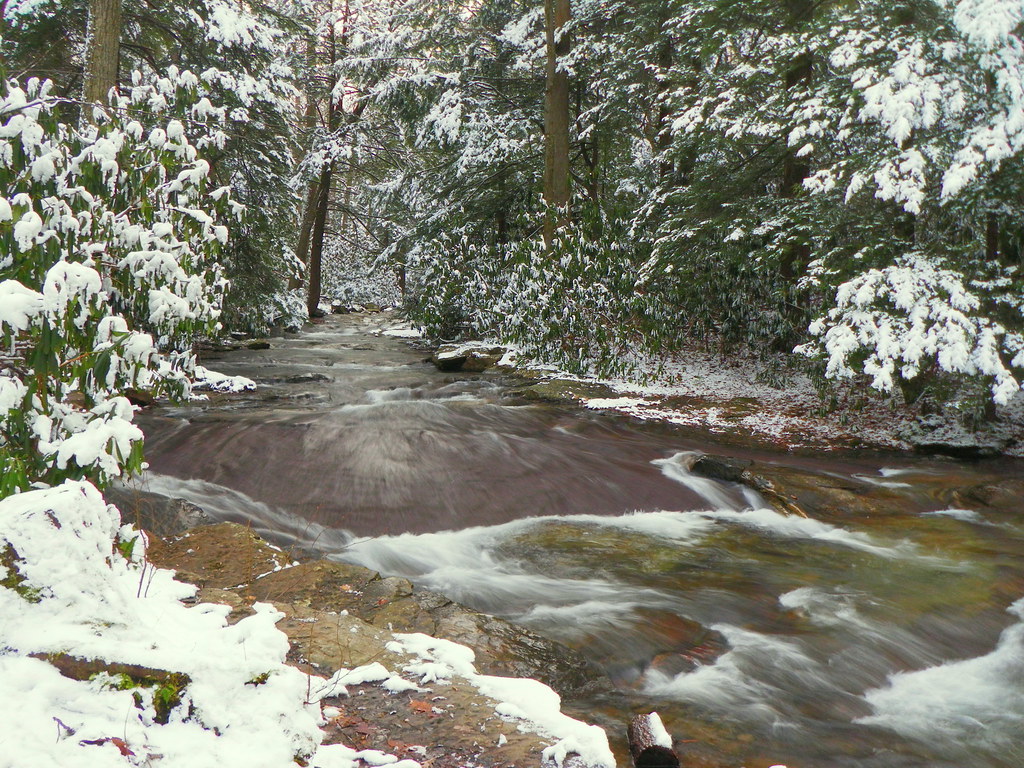
Second, I found that even with a tripod, just the disturbance of my finger pressing the shutter release was jostling the camera enough to fuzz the image, so I use the 2 second timer to give me time to press the release and back away, for a truly motion-free shot, which is essential in low light, or capturing the motion of flowing water, like this.
9. Move
In contrast to the technical recommendation that you not move while shooting the picture comes the artistic recommendation that you DO move before pressing the shutter release. Look at your fishing photos...remove all pictures taken from your average standing height, those taken standing on the bank or in the stream, and those taken while crouching or kneeling, looking down at some subject in front of you. What are you left with? Not many pictures, I'd suspect.
This doesn't mean you shouldn't take those pictures, but I'm encouraging you to also take shots from odd angles, vantage points high and low, and all points in between. Instead of 'fish lying on bank', take a shot from just behind the fish as he's being released, halfway in the water. Instead of the hero shot, get close to your buddy and take a low-angle shot, looking up as he's fighting the fish.
10. Experiment
Perhaps the nicest thing about the advent of digital photography is that there is no penalty for a botched shot...or even a dozen, or a hundred. You can experiment as wildly as you like without it costing you one cent. Try to figure out how to get that shot of your wife, in silhouette, fishing at sunset, with her reflection, an identical silhouette, in the water. Try your continuous shooting option to make a triptych of an emerging sulphur. Try breaking all the rules and taking a crooked, blurry shot of a big fish on the line, jumping out of the water that conveys the intensity and rush of the fight! The most important word here is TRY. There is absolutely no consequence for coming home and deleting all of your experimental shots because they didn't turn out as you hoped (you'll have plenty of others, because you're taking lots of pictures...right?). If you got really close to your intended effect but missed slightly, see if you can't touch it up in Picasa. Try taking a look at some of your pictures in black and white, or sepia, or oversaturated, or faded, etc.
There's no limit to your creativity other than the limits you place. So next time you go fishing, or tying...bring a camera...and put it in an easy-to-reach location.

0 comments:
Post a Comment